
Why developers should opt for open-source vision models

The most interesting use cases of generative AI are those that go beyond basic next token prediction. ChatGPT is nice. Text completion and chat assistants are nice use cases too. But imagine the new opportunities that open up once you start playing with other modalities (audio, but especially vision?).
In this article, we will explore key reasons developers should use open source vision models, and for which use cases. We are also going to code an interesting use case from start to finish.
Vision models are almost as widely used as pure next token prediction models now. That was not the case one year ago. Since then, foundation model companies have made a big push towards multimodality with vision as a core capability to achieve that vision. That opened up new use cases. Here is a list of them for example:
Optical Character Recognition: This allows users to transcribe handwritten notes into digital form rapidly.
Product description generation: E-commerce merchants can use vision models to get a first draft of their product descriptions before refining them.
Image classification: Vision models can be adapted to image classification pipelines to categorize based on the description.
The list of potential use cases is vast and for most of them, developers are better off using open-source solutions for the following reasons:
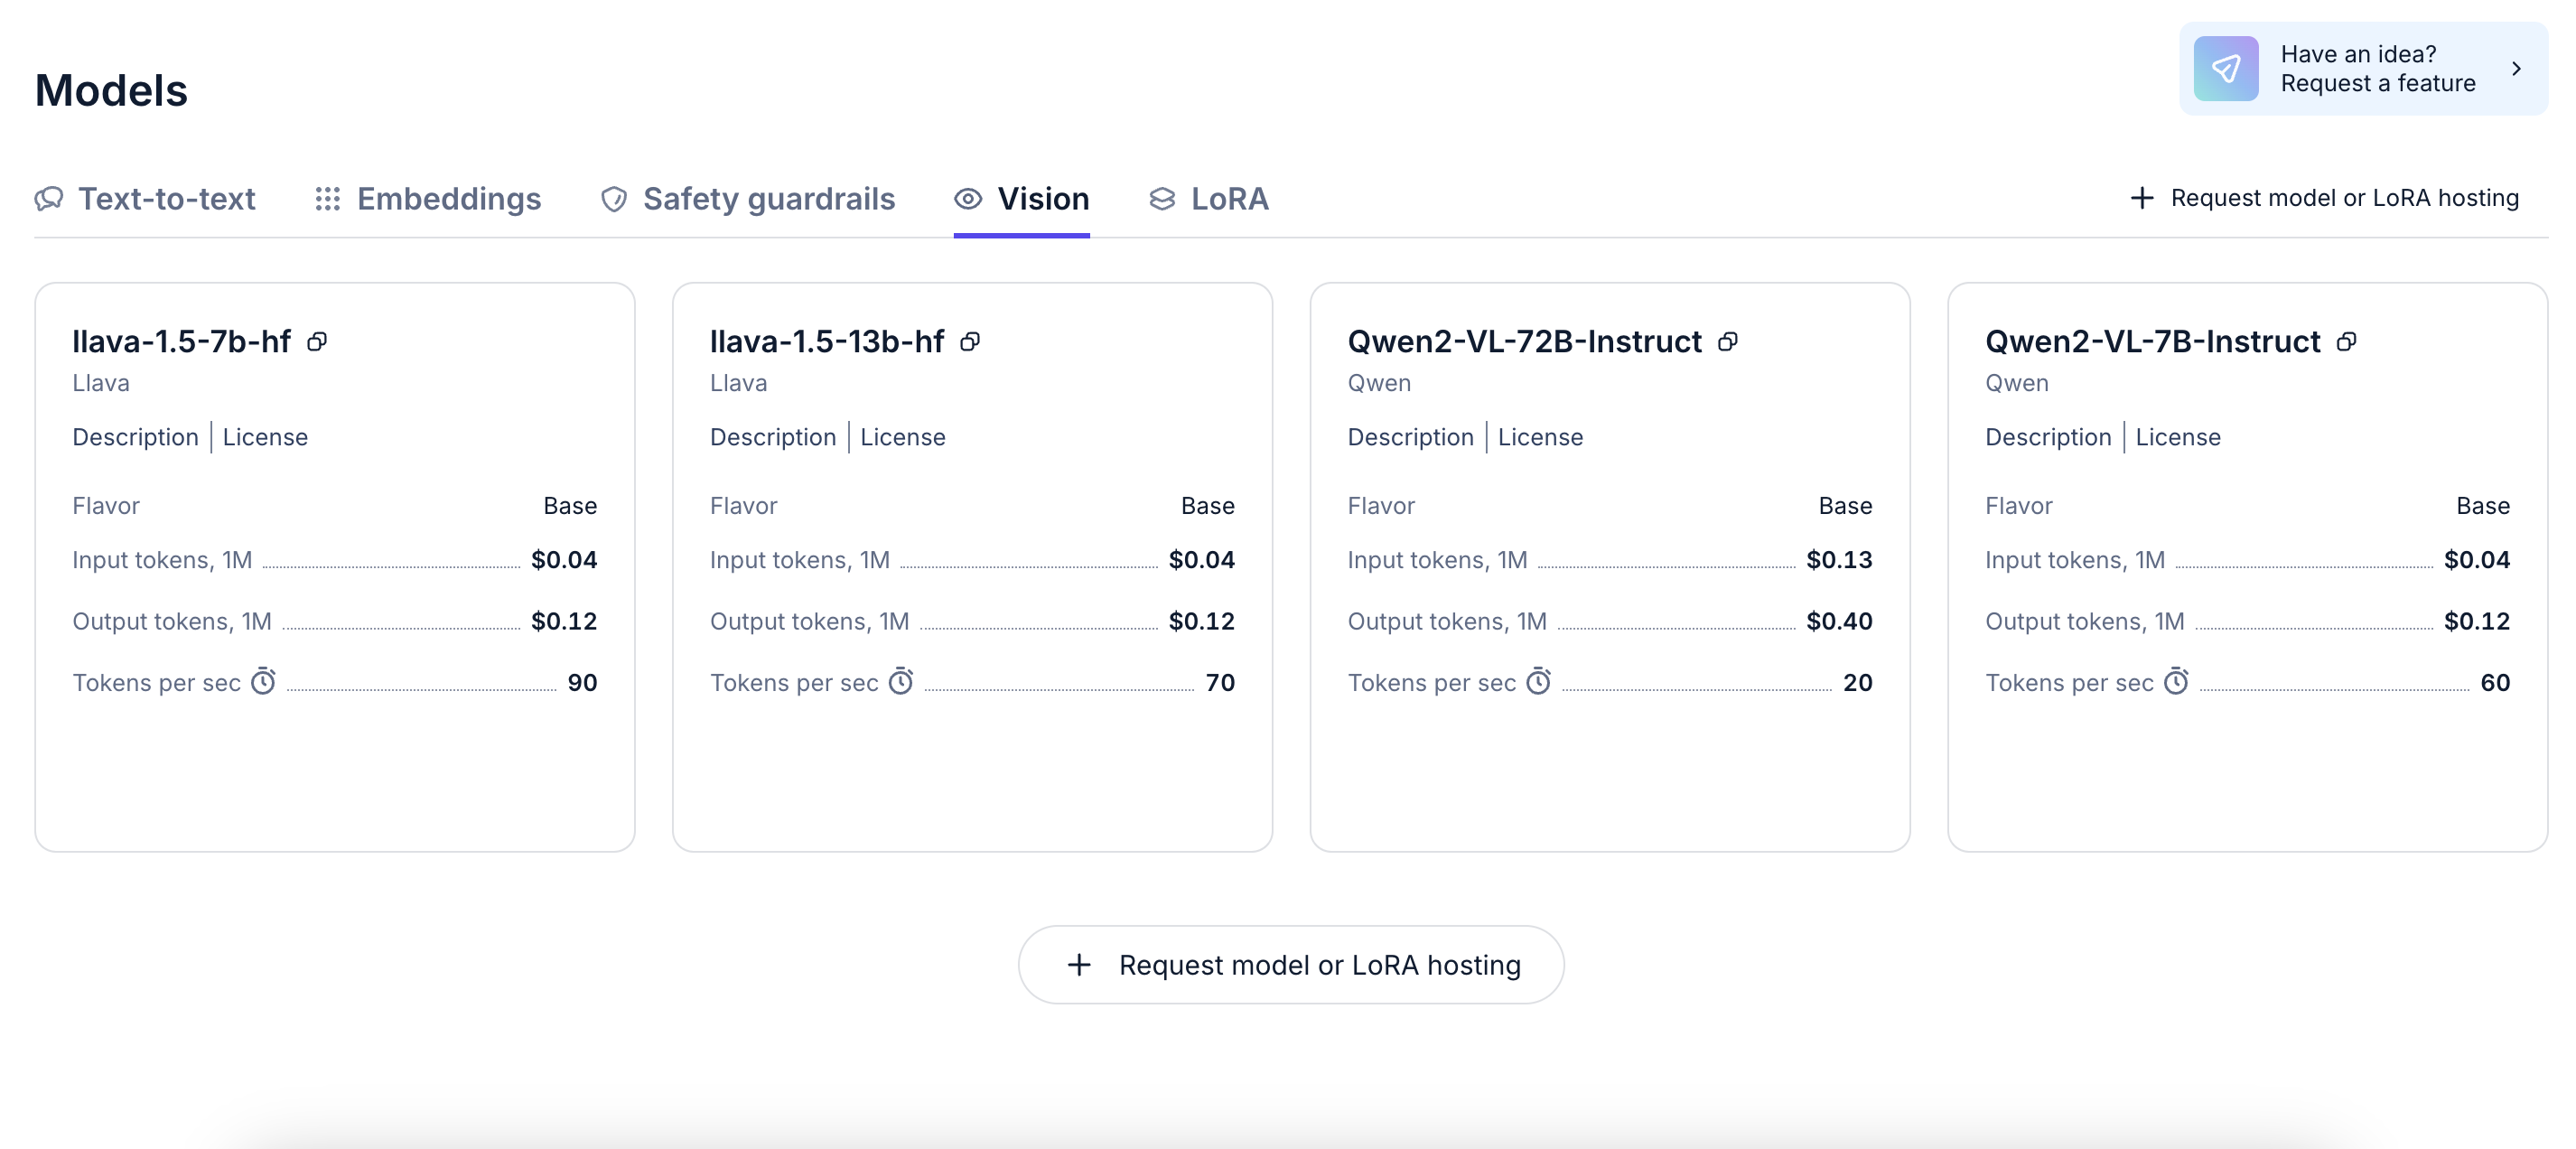
Open source vision models are cheaper. On Nebius AI studio for example, you can access Qwen2-VL-72B, (arguably the most powerful open-source vision model) at $0.13 per input token and $0.49 per million output token. That’s super cheap.
There are simply more open-source vision models than proprietary ones. By choosing open-source, developers can benefit from that diversity of models and combine them in creative ways using ensemble learning, for example. On Nebius AI studio, developers can access Qwen-2-VL (both 7B and 72B), but also Llava-1.5 (7B and 13B).
Finally, by opting for open-source vision models, developers keep open the possibility to later fine-tune those models for their specific use case. By leveraging proprietary data, developers can thus obtain vision models that are uniquely capable for their use cases.
Vision-driven data scraping
Now let’s study a specific use case where vision models can be useful: vision-driven data scraping. The goal of this use case is to automate the extraction of product information from a webpage using a combination of web scraping, image capture, and AI-driven image analysis using a vision model.
Setting Up Environment
The first part of the process is initializing the dependencies we are going to need. The puppeteer library is used to automate the browser for screenshot capture, while fs and path handle file system operations and paths. The OpenAI library is used to interface with a vision model (in this case, Qwen/Qwen2-VL-72B-Instruct) for extracting product information from the screenshot we are going to get automatically. A .env file was created to store API keys (NEBIUS_API_KEY).
const puppeteer = require('puppeteer');
const fs = require('fs');
const path = require('path');
const OpenAI = require('openai');
const dotenv = require('dotenv');
dotenv.config();
Initializing OpenAI Client
After initializing dependencies, an instance of the OpenAI client is created using the NEBIUS API KEY stored in the .env file. The OpenAI client will be used to interact with a vision model from the Nebius AI Studio. That vision model will take an image as input and output product information such as title, price, and description.
If you haven’t already, get a free API key here:
Fast, affordable AI inference at scale by Nebius AI Studio
const client = new OpenAI({
  baseURL: 'https://api.studio.nebius.ai/v1/',
  apiKey: process.env.NEBIUS_API_KEY,
});
Capturing a Screenshot
The captureScreenshot function uses puppeteer to launch a browser and navigate to any given URL. After ensuring the page has loaded (with a 60-second timeout), it takes a screenshot of the page and saves it to the specified output folder. In this case, we are going to navigate to an Amazon product page.
async function captureScreenshot(url, outputFolder, outputFileName) {
  const browser = await puppeteer.launch({
    headless: false,
    args: ['--no-sandbox', '--disable-setuid-sandbox', '--disable-cache']
  });

  const page = await browser.newPage();
  await page.setUserAgent('Mozilla/5.0 (Windows NT 10.0; Win64; x64) AppleWebKit/537.36 (KHTML, like Gecko) Chrome/91.0.4472.124 Safari/537.36');

  try {
    await page.goto(url, { waitUntil: 'domcontentloaded', timeout: 60000 }); // Increase timeout to 60 seconds
  } catch (err) {
    console.error('Page navigation failed:', err);
    await browser.close();
    return;
  }

  await page.setViewport({ width: 1920, height: 1080 });

  const outputPath = path.join(outputFolder, outputFileName);
  await page.screenshot({ path: outputPath });

  await browser.close();
  console.log(`Screenshot saved to ${outputPath}`);
}
Extracting Product Information from the Image
Once the screenshot is captured, it is converted to a base64 string, which is passed to the extractProductInfo function. This function sends the base64-encoded image to the Nebius AI Studio API, where Qwen2-VL-72B processes it and extracts the product information, such as the title, price, description, and image URL.
async function extractProductInfo(imageBase64) {
  const imageBase64WithPrefix = 'data:image/png;base64,' + imageBase64;

  const response = await client.chat.completions.create({
    "temperature": 0,
    "model": "Qwen/Qwen2-VL-72B-Instruct",
    "messages": [
      {
        "role": "user",
        "content": [
          {
            "type": "text",
            "text": "Extract product information from the image, title, price, description, and image URL. Format your response as a JSON object inside a <data> tag. For example: <data>{\"title\": \"Product Title\", \"price\": \"$10.99\", \"description\": \"Product Description\", \"image_url\": \"https://example.com/image.jpg\"}</data>"
          },
          {
            "type": "image_url",
            "image_url": {
              "url": imageBase64WithPrefix
            }
          }
        ]
      }
    ]
  });

  console.log('Response:', response.choices[0].message.content);

  const dataTagRegex = /<data>(.*?)<\/data>/s;
  const jsonRegex = /{.*}/s;

  const dataTagMatch = response.choices[0].message.content.match(dataTagRegex);
  const jsonMatch = response.choices[0].message.content.match(jsonRegex);

  const finalData = dataTagMatch ? dataTagMatch[1] : jsonMatch[0];

  return JSON.parse(finalData);
}
Generating HTML Page with Product Information
After extracting the product information from the image, the generateHTMLfunction takes that data and creates an HTML page that displays the product's title, price, description, and image. This page will serve as a static representation of the product details extracted from the screenshot.
function generateHTML(productInfo) {
  return `
    <!DOCTYPE html>
    <html lang="en">
    <head>
      <meta charset="UTF-8">
      <meta name="viewport" content="width=device-width, initial-scale=1.0">
      <title>Product Details</title>
    </head>
    <body>
      <h1>${productInfo.title}</h1>
      <p><strong>Price:</strong> ${productInfo.price}</p>
      <p><strong>Description:</strong> ${productInfo.description}</p>
      <img src="./screenshots/screenshot.png" style="width: 100%; height: auto;" alt="Product Image">
    </body>
    </html>
  `;
}
Launching the Browser to Display the HTML Page
Finally, the launchBrowserWithHtml function is responsible for opening the generated HTML page from the last step in a browser window using Puppeteer. The page is displayed for one minute before closing the browser. Additionally, the temporary HTML file is deleted after the browser is closed.
async function launchBrowserWithHtml(htmlContent) {
  const browser = await puppeteer.launch({
    headless: false,
    args: ['--no-sandbox', '--disable-setuid-sandbox', '--disable-cache']
  });

  const page = await browser.newPage();
  await page.setUserAgent('Mozilla/5.0 (Windows NT 10.0; Win64; x64) AppleWebKit/537.36 (KHTML, like Gecko) Chrome/91.0.4472.124 Safari/537.36');

  // Write the HTML content to a temporary file
  const tempFilePath = path.join(__dirname, 'product_page.html');
  fs.writeFileSync(tempFilePath, htmlContent);

  // Open the HTML page
  await page.goto(`file://${tempFilePath}`);

  // Use setTimeout to wait for 1 minute (60000 milliseconds)
  await new Promise(resolve => setTimeout(resolve, 60000));

  // Close the browser
  await browser.close();

  // Delete the temporary file
  fs.unlinkSync(tempFilePath);
}
Executing the Main Workflow
Here is the processImage function that orchestrates the entire workflow. It starts by capturing the screenshot, converting it to base64, extracting the product information, generating the HTML, and launching the browser to display the result.
async function processImage(url, outputFolder, outputFileName) {
  // Capture the screenshot
  await captureScreenshot(url, outputFolder, outputFileName);

  // Convert the screenshot to base64
  const imagePath = path.join(outputFolder, outputFileName);
  const imageBase64 = fs.readFileSync(imagePath, { encoding: 'base64' });

  // Extract product info from the image
  const productInfo = await extractProductInfo(imageBase64);

  // Generate the HTML content based on the extracted info
  const htmlContent = generateHTML(productInfo);

  // Launch the browser to display the generated HTML
  await launchBrowserWithHtml(htmlContent);
}
This use case is an effective example of combining web scraping, image processing, and AI to automate the extraction and presentation of data. We have just scratched the surface of what is possible when leveraging vision models, but hopefully that gave you ideas to explore.
Happy coding.